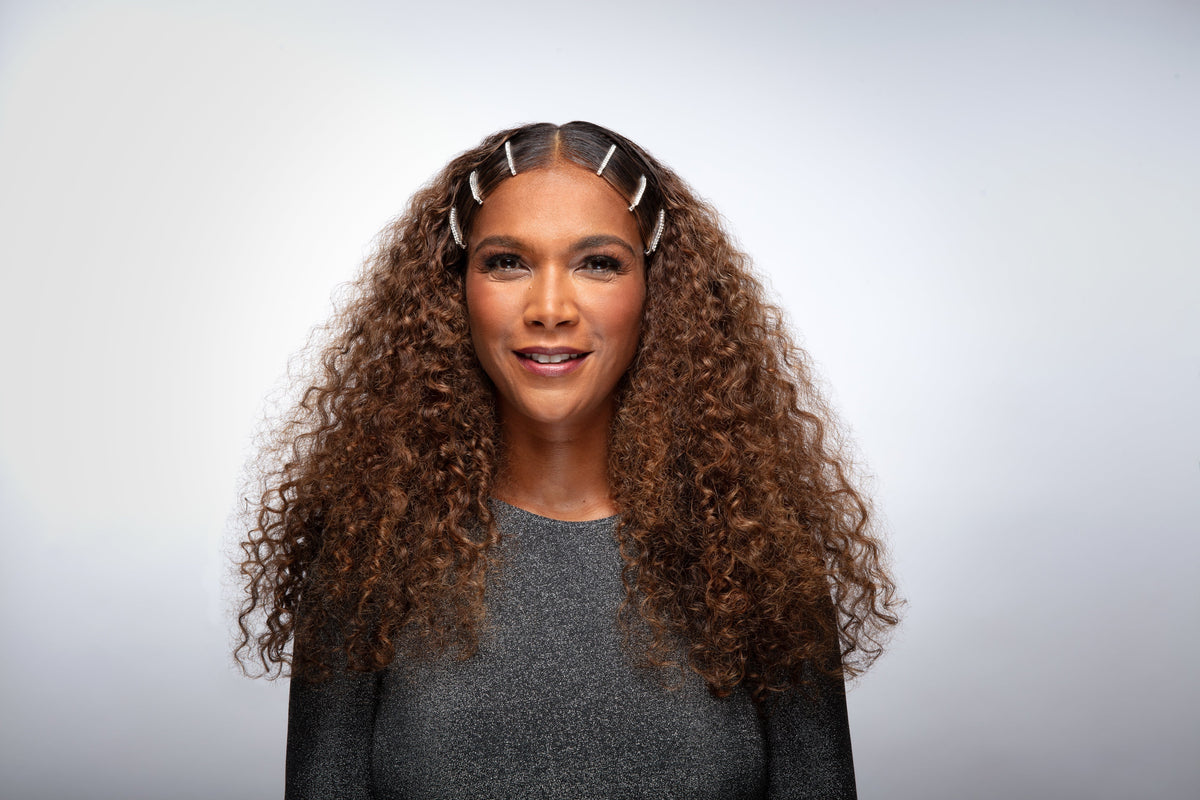
Creating this face framing curly hairstyle strikes the perfect balance between sleek sophistication and embracing the natural volume and texture that makes curls so unique. Whether you're prepping for a special event, an evening out, or a festive family celebration, this silky center-part hairstyle is an ideal choice. This holiday look combines the polished, controlled look of smooth front sections with the amplified volume of your natural curls.
Table of Contents :
- Meet the Expert
- Required Products & Tools
- Step-by-Step Guide to Face Framing Curls
- Do I Have Curly Hair?
- Festive Styling with Curlsmith
Meet the Expert
Anastasia Stylianou is a renowned freelance celebrity hairstylist and textured hair specialist with a wealth of global experience. Her career as a sought-after session stylist has taken her to fashion runways, high-profile editorial shoots, and red carpet events worldwide. Known for her artistry and deep understanding of textured hair, Anastasia seamlessly blends creativity with precision to deliver stunning, customized looks. Whether she's crafting bold statement styles or enhancing natural curls, her passion for textured hair care and styling shines through in every masterpiece she creates.
Required Products & Tools
First of all, let's get clued up on the tools and curl products Anastasia Stylianou used to create this festive look.
- Smoothing brush
- Pin tail comb
- Diamante clips
- In shower style fixer
- Flexible Finish Hairspray
Now we've got the essentials sorted, let's get started!
Step-by-Step Guide to Face Framing Curls
The holidays are the perfect time to add extra sparkle to your curly hair routine, and this look is no exception. By incorporating decorative diamante slides into this style, you can easily take it from casual chic to festive glam in just a few steps. Best of all, this face framing hairstyle works wonderfully on day two curls, so you can extend your wash day and still achieve a head-turning look without the need to start fresh.
Let's walk through this effortless, step-by-step, using Curlsmith products designed to define, smooth, and enhance your curls while adding that holiday-ready touch of glam.
Step 1: Prep Your Curls for Framing

Start by lightly misting the roots of your hair around the front hairline with water. This will rehydrate your curls and prep them in receipt of the gel styler, making them easier to manipulate for that sleek finish.
Step 2: Create a Clean Center Part

Using a pin-tail comb, carefully part your hair straight down the middle. Start from your forehead and work a few inches back to create a neat, defined parting. This clean center part will give your front sections a sleek, polished look while leaving the rest of your curls free to shine.
Step 3: Section the Front Pieces
Now, before adding stylers, separate about 1–2 inches of hair on either side of your center part. These front sections are the key to achieving that sleek, smoothed-down look, while the rest of your curls remain voluminous and defined.
Step 4: Smooth Down the Front Sections

Apply a generous amount of one of our best gels for curls, the In-Shower Style Fixer to the front sections of your hair. This gel provides a strong hold, making it perfect for sleek styles. Use a smoothing brush or fine-tooth comb to evenly distribute the product and ensure that the hair lays flat against your head. Once smooth, tuck each side behind your ears for that effortless, silky finish.
Step 5: Secure the Style with Decorative Diamante Slides

Now, for the fun part - add some sparkle! Take your decorative diamante slides and gently secure them on each side of your head, just above your ears. Place three slides on each side, ensuring symmetrical alignment for a polished, glam look. These little details will add that extra bit of flair.
Step 6: Fluff and Define Your Curls

With the front sections sleek and secured, it's time to bring the rest of your curls to life! Use your fingers and a Bamboo Pick to gently separate and fluff your curls to add volume and create a bigger, exaggerated shape; how big you go is down to personal preference. The contrast between the shiny front and voluminous curls will make this look stand out!
Step 7: Set the Face Framing Hairstyle

To ensure your style lasts all day (or night!), finish with a light spritz of our Flawless Finish Flexible-Hold Hairspray. This will lock your sleek front sections in place while keeping your curls defined, bouncy, and full of natural movement. No stiffness - just perfectly touchable curls with a sleek, polished vibe.
Do I Have Curly Hair
This look works beautifully on all curl types, but you might be wondering how to determine if you have curly hair. Identifying your curl type is a great starting point, but it’s just one piece of the puzzle. Factors like porosity, density, and texture significantly influence how your hair reacts to products and care routines. Ready to learn more? Take our curl quiz to discover your unique curl type and get personalized insights to support your haircare journey!
Festive Styling With Curlsmith
And there you have it! A sleek, center-part hairstyle that combines polished sophistication with voluminous, defined curls—perfectly topped off with a hint of sparkle. Happy styling, and enjoy your Curlsmith creation!